Trong bài viết này, tôi sẽ chia sẻ với các bạn cách xây dựng Blog Template với Gulp 4, Pug, Sass.
Nội dung
1. Chuẩn bị tài nguyên
Chúng ta cần một số ảnh để hiển thị trên giao diện, trong bài hướng dẫn chúng ta có thể tìm kiếm một số ảnh phù hợp từ google. Tất cả các hình ảnh trên sẽ được lưu ở thư mục assets/image
2. Xây dựng phần hiển thị danh sách blog
2.1. Khai báo danh sách nội dung và đường dẫn ảnh
Thêm đoạn code sau vào file index.pug.
- const blogs = [{title: "The 5 things Sketch can do that Photoshop
can't", subTitle: "Even if you haven't made the switch yet, you're likely
aware of the mass of exodus of Photoshop users switching to Sketch",
imgCover: "https://cdn-codegym.cdn.vccloud.vn/assets/images/design-tools.jpg"},{title: "Altered fast food
logos and they're going viral on twitter",subTitle: "Not all heroes ware
capes",imgCover: "https://cdn-codegym.cdn.vccloud.vn/assets/images/burger.jpg"},{title: "Skill work better
with developers",subTitle:"No, this isn't another 'should designers code'
article",imgCover: "https://cdn-codegym.cdn.vccloud.vn/assets/images/coding.jpg"},{title: "Designer
in USA",imgCover: "https://cdn-codegym.cdn.vccloud.vn/assets/images/us-flag.jpg"},{title: "How to join a great
conversation",imgCover: "https://cdn-codegym.cdn.vccloud.vn/assets/images/conversation.jpeg" },{title: "3
things we don't know about design",imgCover:
"https://cdn-codegym.cdn.vccloud.vn/assets/images/questions.jpeg"}]
Ở đây chúng ta khai báo biến mảng blogs để giữ danh sách các blog, bao gồm title, subTitle và imgCover. Từ danh sách nào chúng ta sẽ đổ ra giao diện danh sách blog với nội dung tương ứng
2.2. Xây dựng khung html với pug
Với bố cục giao diện như trên, chúng ta sẽ viết pug như sau:
html
   head
       link(rel="stylesheet", href="css/style.css")
   body
       main
           section.blogList
               h3.sectionTitle See what else is new
               div.blogListContainer
                   each item, index in blogs
                       div.blogItem
                           div.image__wrapper
                               img.blogCover(src=item.imgCover, alt="")
                           a.blogTitle(href="")=item.title
                           p.blogDescription=item.subTitle
Như các bạn đã thấy, với pug, ở đây chúng ta có thể sử dụng vòng lặp, ngoài ra pug còn có biểu thức điều kiện, toán tử, … Đến đây chúng ta đã thấy danh sách đã được hiển thị ra nhưng chưa được đẹp, việc làm đẹp sẽ bắt đầu ở bước tiếp theo.
** Nếu tất cả thư mục và file nằm trong assets/images chưa được copy vào thư mục dist/assets/images, chúng ta cần fix lại đoạn code sau ở file gulp.js. Sau đó chạy lại lệnh gulp serve để chạy chế độ live reload.
function assetsTask() {
   return src('assets/**')
       .pipe(dest('dist/assets'))
}
2.3. Styling giao diện
Các bạn đưa đoạn code sau vào file style.sass
$primary: rgb(255,37,85)

html
   font-family: Verdana, Geneva, Tahoma, sans-serif

body
   margin: 0
   padding: 0

main
   max-width: 1440px
   margin: auto

.sectionTitle
   text-align: center
   opacity: .6
   font-weight: 500
   text-transform: uppercase
   margin: 2rem 0
   font-size: .9rem

.blogListContainer
   width: 100%
   display: grid
   grid-gap: 2rem
   grid-template-columns: repeat(3, 1fr)

.blogItem
   height: 600px
   .image__wrapper
       height: 300px
       box-sizing: border-box
       margin-bottom: 3rem

       .blogCover
           width: 100%
           height: 100%
           object-fit: cover

   .blogTitle
       color: $primary
       font-weight:
       text-transform: uppercase
       text-decoration: none
       display: -webkit-box
       -webkit-line-clamp: 3
       -webkit-box-orient: vertical
       overflow: hidden
       height: 4.5rem
       text-align: center
       font-size: 1.2rem

   .blogDescription
       text-align: center
       opacity: .6
       display: -webkit-box
       -webkit-line-clamp: 4
       -webkit-box-orient: vertical
       overflow: hidden
Vậy là chúng ta đã có một giao diện như sau:
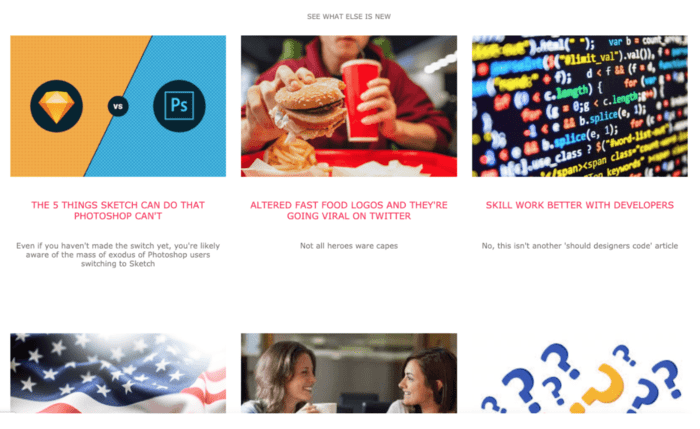
Kết: Ở phần 2 này chúng ta đã tập làm quen với pug và sass, dùng pug và sass để build phần giao diện danh sách blog. Ở phần tiếp theo, chúng ta sẽ xây dựng phần Carousel Banners của template.
Chúc các bạn thành công!
Link Github: https://github.com/nguyentd92/gulpjs-demo
Author: Nguyễn Thành Danh
Xem thêm các bài viết chia sẻ, hướng dẫn học lập trình tại đây.


0 Lời bình